Finally we are coming to the {Take Four: assembling}. Today I have many images to show you, so you probably need to get a cup of tea of coffee. If there's any part that you don't understand, please let me know I will try to explain again. So, I ended up with 9 patchwork pieces. This would give me more options when I play around the assembling.
Here are my 9 patches. I just realized I have most of them in lighter color schemes only a few were darker. The size of each patch is similar, but some are bigger by 1 or 2 inches. This time the patchwork sizes are smaller than the ones that I had in last few projects.
I picked out 6 patches for the tote that I am making then play around the layout.
First trimmed of the batting that's not cover with fabric and give a bit clean look.
Some patches are off, but after the trimming. It will either be squares or rectangles. It depends on your patchwork pieces looks like.
After all the trim.... lots pieces are off... I wish to save them all, but maybe not this time...
Now 6 pieces are trimmed and clean.
When put them together there were two pieces bigger by one inch. Then trim off the differences. You might not have this problem. As you might recall that I used scrap batting for this project, so the batting size where roughly cut.
Do you see? The center piece is bigger than the two pieces next to it.
Trim off the differences.
After trimming play around the patches again and try to find the good layout for it again. You might not need this step if you only have one or two patches that's large enough for your front/ back pieces.
Top: three patches are ready { This would be front piece of the handbag}
Bottom: three patches are ready { This would be back piece of the handbag}
On to assembling patches together. Take two patch pieces and put them right side together and use pin to stable patches.
Use 1/4" seam allowance for entire project. I prefer back stitches on the top and bottom of the assembling. I back stitches about 1/2". It will help two patches held well together.
Approach to the end of the patches, do the back stitches as well.
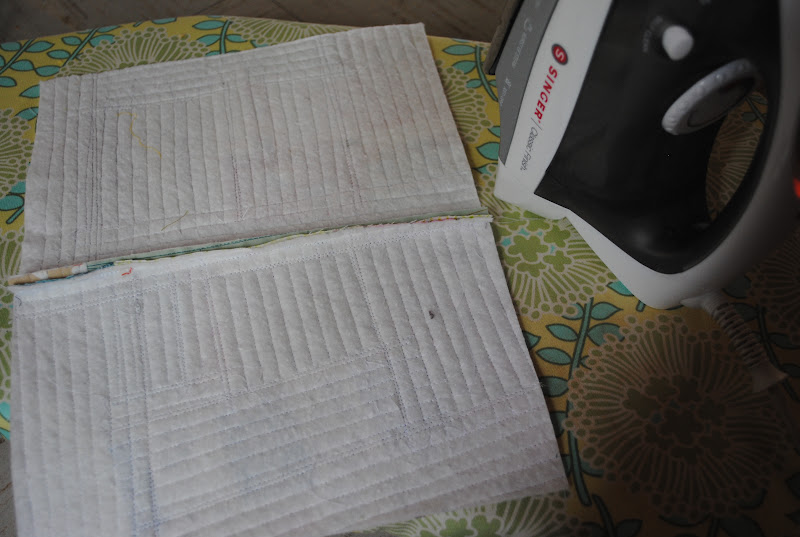
Look back of the patches. Open the seam.
Due to the batting, the seam will be heavy. Use iron to open the seam { very lightly press}.
After ironing.. the seam will be flat
Sew over the open seam { You can use zigzag or straight lights}. It will help to enforce the patches together at the join seams.

Continue the same assembling join sewing until your patches are assembled. If you need to adjust the sizes of your front and back piece. It is a good timing to do so! NOW I look at two patchwork pieces as one big fabric pieces instead of patches.
This patchwork tote is for S, so I trimmed down the sides. It was too wide for her. I used the trim off side pieces then attached to the bottom part of the patches.
I saved the other small pieces then patched them together. I am thinking a little coin pouch for myself. No waste!
Note one: After all the assembling and trimming. I have two pieces finished at 11.5"x14.5". Since I am working with simple tote pattern. I use the most simple bag making method. I put two patchwork pieces right side together. Then pin around the two pieces. Sew around the tote with 1/4" seam. Leave the top open.
Note two: At this stage. You will be able to design the look of you bag. If you are not working with simple bag pattern. Look at your patchwork pieces as a whole piece of the fabric. That would give you some freedom of playing your bag patterns.
Decided the bottom width of the tote. I used 1" for the bottom width. Draw your width line then sew on the line you drew.
Trim it off and leave 1/4" seam allowances. Do the same on both side of corners.
Now you have the outer bag finished.
Lots patches and assembling inside..
If you missed last three takes.. Check them out!
{Take One}
{Take Two}
{Take Three}
xxC


 Continue the same assembling join sewing until your patches are assembled. If you need to adjust the sizes of your front and back piece. It is a good timing to do so! NOW I look at two patchwork pieces as one big fabric pieces instead of patches.


Oh my gosh, this is sooo awesome! It's the first time I've seen what you are doing with this (I hadn't seen the first posts) and so I didn't quite "get it" at first - then I saw the bag standing up and I thought, wow! It looks really great.
ReplyDeleteThank you!! If you make one please share with us! I hope everything makes sense to you!! xo
DeleteGreat take, Chase! I wouldn't have thought to sew the seam allowances down, but it makes perfect sense. Lovely explanations!
ReplyDeleteI am glad some of the process was explained the way I hoped! I was worried I didn't explained well! That's why I took so many photos for one post. I have great time making these post!
DeleteThank you!! xox
ReplyDelete