Wednesday, May 24, 2017

Forest Hill Embroidery pattern + knit bag making sewing Pattern


I am so excited to have my very first illustrated embroidery pattern launch today. It has been a great time working with illustrations and new freshly pattern ideas.  I love the different process of choosing colors, getting different tiny stitches in and make the line artworks come vivid and versatile, all together. 

Illustrating is part of my daily exercise in an informal everyday journal, getting ideas in planners, sending greeting cards, and putting kindly notes in the mail. It is something that I have been doing since in art school days and loving it so much! I have always desire to make illustrations and create/design embroidery patterns, in someway.   So here I am working on Forest Hill Embroidery Pattern as my very first try of getting the illustrations into fine line artwork and used with embroidery flosses.

Forest Hill Embroidery pattern is truly inspired from a trip to Bear Mountain, New York last Autumn. The illustrations are captured of the leaves that collected through the mountain walk. The late summer and early Autumn colors in the wood is such generous and versatile. 

Within the pattern also comes with a simple knit bag making pattern. As last year, I have made numbers of knit bags and have asked by many knitter friends how can they create something simple for their yarns, needles, and projects on the go. I though combining these two are a perfect way!


I love to share more of the the embroider pattern, I used loose count linen cloth for the embroidery. There are 7 different basic embrodiery stitches used in the embroidery pattern. The branch in the center, is created with Fishbone stitch and used three different shade of greens, finished up with stem stitch.

Both top left side two leaves used chain stitch to outline the shape then filled in with small chain stitches. Top with stem stitch for the stem and French knots.

The top coral leaf is outline with backstitch then filled in with satin stitch. Top with backstitch for the stem. 

I give the bottom green leaf two different greens to create a little fun look; used the backstitch on the outline of the leaf then used satin stitch to fill in. 

On page 5 of the PDF file pattern, you'll find a full page information on DMC embroidery color number suggestions, flosses number used, and stitch used on each line artwork. You can also create your own color scheme, to make one of your kind work!

For the knit bag making, it is a simple drawstring bag making. The bag is finished at 11.5"x11.5" that will allow to fit 3 skeins of yard, an unfinished project and few pairs of knitting needles. I was always surprised to see my knitter friends tuck their project in their purse or tote without a bag to held all the materials together . I always asked and worried if their yarn will get twist together or loose a stitch or two from the needles.


Forest Hill Embroidery Pattern + knit bag making sewing Pattern. 

-5 different tracing embroidery pattern methods within the pattern
-A full page of Instruction sheet of each artwork's DMS number, floss usage, stitch usage
-Full scale of Forest Hill Embroidery outline artwork and a reversed version.
- Illustrations of 7 different embroidery stitches
- Full colored photos of how to make a Knit bag

Supplies-
- The embroidery artwork fits in one 8" embroidery hoop
- 1/2 yard of loose linen or cotton fabric

- DMC embroidery flosses 
- Embroidery needles
- A small safty pin
- Water soluble pen

- Small scissors 

Now, you can find the pattern via my {Craftsy Pattern Store} and {Etsy shop}

Enjoy!

Thank you,

xxc

Saturday, May 20, 2017

squares in square block templates + tutorial

Thursday and Friday were summer alike here in the city. It was a different kind of May month that I am experiencing. The apartment reached  90 degree (puff!) It was really warm up in our floor. I have been searching a possible small a/c for the workroom, but will wait for another few weeks to decide if I really need it. 

I have been getting the squares in square block aka economy block templates ready and printed out a few pages before making a quick tutorial for you. When you download the file, please make sure to uncheck the scale to fit and make sure it is printing in 100% scale. I've added a 1" test block for checking the correct printing scale. 

For squares in square block, I've used lots characters prints for the center square. Most of these prints were gifted to me during a kindly swap in the past and some of my own (not many). You might not know that I always have hard time to cut into a cute images and feel sorry that I chopped of the look. I keep small stash of character prints and used really little in my projects.

In the template sheet you'll find two squares in square pattern. One is finished at 4" squared and one is finished at 5" squared. You'll need to add 1/4" seam allowances before trimming the finished block. 

Fabric usage for 

4" block: ( seam allowance has included)
(1) 2.5"x2.5" for a center print (with sweet character) 
(2) 2.5"x2.5" for b, c   inner triangles
(2) 3.5"x3.5" for d, e   outer triangles

-Cut 2.5"x2.5" squares in half on the diagonal,make 4
-Cut 3.5"x3.5" squares in half on the diagonal,make 4 

5" block: 
(1) 3"x3"  for a center print (with sweet character) 
(2) 3"x3" for b, c    inner triangles 
(2) 4"x4" for d, e    outer triangles

-Cut 3"x3" squares in half on the diagonal, make 4
-Cut 4"x4" squares in half on the diagonal, make 4 

In this tutorial, I used the 5"x5" template...

Making Center Piece cut: 
There are many methods for getting a nice fussy cut. I preferred to use a small grid ruler and set on top of the image that I plan on using. It is easy for me to see through the image from the ruler and decide if the fussy cut looks good.

Use a water soluble ink pen to mark the square around the image. I used a pair of scissors to cut the image off.

Paper piecing: 
Step 1: Place the center piece in the WRONG side of the paper pattern. Take paper and fabric against a sunny lighted window to see the pattern line and making small adjustments to allow the image centered. Use a fine pin to pin the center piece in place.

Step 2: Align one 2.5"x2.5" inner triangle facing RIGHT side together on top of center print. You can use another pin to held the fabric in place or slowly turn it to the back side. 

STEP 3: Turn the paper to opposite, where the pattern lines were.  Before you sew, check on your stitch length, I recommended set it at 1.8 if your machine has the adjust stitch length setting on that or shorten the stitch length on your machine.

I always put the sewing needle down at the START POINT then sew a short straight line then back- stitch to avoid the later loosing thread issue. When it comes to the END POINT repeat the back-stitch to finish up.


 Now, you can see the triangle is sewn to the paper.

STEP 4: Repeat for the opposite side of inner triangle. I always stop here and give a gentle iron "press". That means sat the iron down for few second, don't move in an up and down motion. Just lightly press. That will give a nice edge to work on.

STEP 5: Now you'll work the left and right side of inner triangles . Align the 2.5"x2.5"  inner triangle facing RIGHT side together with center piece and corners of two top and bottom inner triangles. Repeat STEP 3 to finish up the inner triangles sewing.


Step 6: For paper piecing, remember to flipped the paper away and give a nice 1/4" seam trim when  finish any side of join. It will give a nice clean look.

 Another nice iron "press" .

Step 7: Align 4"x4" outer triangle facing RIGHT side on the joined unit (center piece + inner triangles). Repeat Step 3 to finish Outer triangle sewing.

 Check Point: 
 You'll have an uneven edges when you finished the assembling.

Turn to the pattern line side. You should find small stitches  sewn on the straight lines. Clip away any excess threads.  Trim the patchwork block away from 1/4" seams on the paper. However, I always wait till very end to trim the patchwork blocks, likely before ready for assembling into quilt top.

Nice clean edge Squares in square block aka economy block for any baby quilt, mini quilt, table runner, any cute projects you have in mind!

Now, you can find the free download squares in square foundation pattern as PDF file at {Craftsy} and Dropbox {here}. I worked on Dropbox since I knew many of you don't have a Craftsy account. For Dropbox file, simply click the link then it will direct you to the download page. On the top right side of the screen, you'll find DOWNLOAD. Click on download then it will load to you computer then save the file to your computer.


Enjoy,

xxc

Wednesday, May 17, 2017

A mini quilt


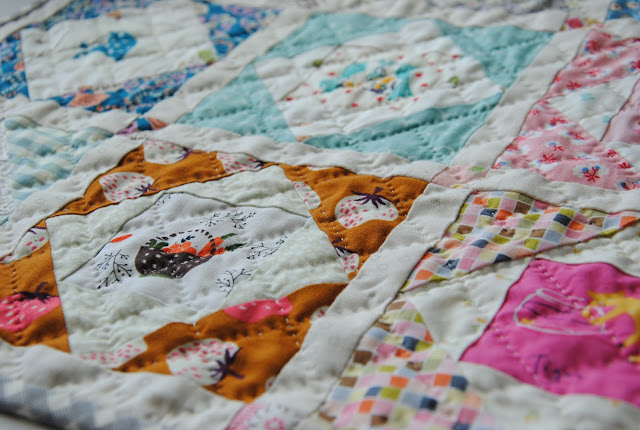
The mini quilt is finished a few weeks ago. I really had hard time to decide if I should try to make a cushion, but the more I work on it the decision was really towards to another mini quilt.  This is such a cute little mini quilt!

It is the first fussy cute mini quilt that I've worked on and it is additive! I was very lucky to have friends sent and shared their treasure prints with me to make this mini quilt I've also used some from my own stash.

I love how simple this mini quilt turns out and have used versatile prints to bring out the fussy center prints. The biggest investing in this mini quilt is choosing the fabrics to make the patchwork block. It is something that I am finding it as a serious decision to make it right and gives good contrast in betweens, colors, scale of prints,  and arrangements.  I love using small sashing to bring the patchwork blocks apart, so it is letting each block to be seen individually and able to focus on its own.  As for all the mini quilts, I like to hand quilting them. It added extra texture and loveliness to the small piece of patchwork.

For the binding, it is a old print from mama said sew for Moda. I love love use gingham print for binding. I particularly love using gray/white and black/white. The white is probably more off white, so it wouldn't be extremely white or  bright.

There are three blocks didn't make it into the mini quilt. I still have not decided what to make with them, maybe another mini quilt or this time could be a small cushion or a little coasters? um.. do you finding decision making sometimes is hard!

Each small patchwork block is finished 5"x5" and the center print is cut 2.5"x2.5". I'll be sharing the template soon, but still working on the links to get it ready for you. Stay turn!

xxc


p.s. Thank you for "thinking" of me! I am much well and improving! The treatment has started and I am learning different way of of consuming food and getting into new lifestyle. It is such a hard lesson to take. I have been slowly feeling the strength back this week particularly and hopefully after the treatment is done I will be the young me again! ( giggled)

Wednesday, May 3, 2017

May Day


May is officially arrived! I am in wowing the flowers showcases in my neighborhood. It is just so pretty and gorgeous. I have been enjoying making these court step blocks lately and attempted making one block a day. This quilt has a name, did you know? I named it Corn Field, yellow and green.

Few weeks ago, I  put 12 small blocks into a large patchwork piece, just to see how it looks like, together. It is so satisfy! It didn't take much time to take the paper pieces off from the back at all! I have really gotten better with the time management in making one.  

Of course I had to add few more greens and yellows for Corn Field Quilt, since a few prints that I am using is running short and really like to save a small piece for the future.  

The back look of the patchwork piecing is so "clean" and I like how doesn't have much thread hair coming off now. It seems like a little problem for my other patchwork pieces, big and small. I often taken time with a small scissor to trim the excess thread hair before quilting. So far this quilt is neat and clean {gotta love that}. 

Did you get your Mother's Day cards mail out? I have mailed out mine last week and it should take a good 10 days to get to my mama. I hope ma will love this card that I made her this year and S made one for grandma, too.  It has been fun getting personalized cards made lately and getting things off lists. 

and did you know that I put together the farmer's wife 1930's quilt top {added the borders as well}+(yay}? It is a giant piece and I called it my EPIC quilt! I mean giant quilt=big quilt (biggest quilt I've ever made) and too big for any mattress around here. It will for sure sending to a long arm service to have it professionally done.  It doesn't fit in the floor space around here either, so I can't really take a good photo to share with you {peak over here}. I plan to work on the quilt backing soon and you'd be surprise how it look like. I want to talk more about it when I have it quilted and ready to take photos and you'd know why I called it my epic quilt, stay turn! 


Other side note:

Other than all the good sewing journeys+time, I am doing better! It is no secrete that I have been unwell for sometimes. I didn't think I should say more here, but I like to let you know when I am absent sometimes, I am resting and some of the days are harder and some of the days are better. I have a lot thoughts since met the doctor last time and have gone through some testing and waiting for report now. Please don't feel sorry for me because I don't!  

I just think that here at quarter inch mark should be a positive, energetic, and lots crazy sewing journey to share. It is hard to say days are always perfect and fill with happiness because some of the days actually felt dark, difficult and emotional
{ because i am just not well). I tried my best to keep my spirit up and take every stitch I can when I can fully focus. 

Now, take away your worries from me because that made me worry you! 
I will be alright and that's a promise! 

xxc 

SaveSave