First of all, thank you for encouraging me to write up this tutorial! I don't think I am the best writer, but I will try my best to explain each step and share with you. I'd love to see you make some of these fun {patchwork buckets}. You can make one bucket within 2 hours and enjoy this tutorial. It has 71 images, so you'll need a cup of good tea to go with it!
I am leaving out all the measurement of each item, since everyone's {patchwork bucket} size would varies. This tutorial is to share the how/steps.
Supplies List-
Fabric
Cotton Batting { either fusible fleece or none fusible}
Craft bond spray adhesive { for none fusible batting}
Pick up a round shape item that would allow your making the circle { any size}
Two 8" long cotton webbing
Sewing machine
Thread
ruler
scissors
black sharpie pen
There are two main body parts of the {patchwork bucket}. This is the
base part of the bucket. Find the round shape that's in your desire size of making the bucket. You will find that you might waste the four corner fabric pieces, so put your round shape on top of your fabric piece before you cut out that would eliminate the fabric waste. Bond the fabric to the cotton batting. I used
Craft bond spray adhesive. You may also choose use the fusible fleece instead. I highly recommend to use the heavy weight instead.
After you have bond the fabric to the batting piece. Use sewing machine and quilt it! I have been using the masking tape to guide the sewing lines for most of my grids or strips quilting. However, this method seems work well with small projects instead. I chose darker fabric for the base since it will be sit on any surface. That would help to prevent getting dirty look after few uses.
You will follow the edge of the masking tape to quilt! You will be able to reuse the masking tape till you finish quilting part. Then dispose the tape.
This is the look after you quilted! I have always done my base quilting this way for the {patchwork bucket}! It gives a nice clean look. It also enforce the batting and fabric together!
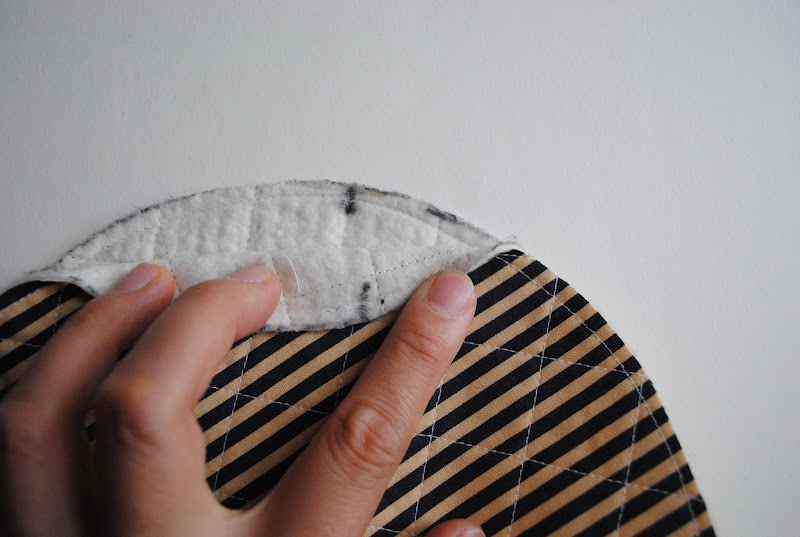
Now, Turn your quilted base piece upside down. Put your round shape template on top of it. Use your black sharpie and trace around the round shape.
This is the look after your drew your circle.
Set your sewing machine to 1/8" seam. What I did was I sew around the circle with 1/8" to prevent any sewing lines falls. You may eliminate this step, but I have always found it help the project at the end result.
This is the look after you sew around the edge with 1/8" seam.
Cut around the line that you drew.
Now use your ruler to measure the diameter for the circle. Make sure your ruler is set 180 degree cross the circle, so you are not off! This circle was measured in 8.25". Get a piece of paper and write down the diameter number.
Now you want to marking marks on 30 degree, 60 degrees, 90degrees around your round base piece.
My shortcut way: I folded the circle to half then mark on each end of the folded points.
Here you can see clear with the image.
Then you match the two marks you just made and folded. You'll make another two marks on the other two end of fold.
Here is the four marks.
Make cross marks on the 90 degrees' marking and small dots on the 180 degrees' marking.
Now it is a little tricky.. You wanted to match the 90 degree mark and 180 degree mark together. That would allow you to get the 30 degree mark. If this step is confused you, you may simple use your quilting ruler to mark your points. After you finish all the marking set the bast piece aside.
Remember the diameter measurement that you put down on piece of paper?? Now it is time to bring it out. We need to do some math here, so we can get the main body part of the patchwork bucket measurement. We are using the circumference equation to get the main body part .
Diameter x 3.14 + 0.5
The one I have is 8.25x3.14= 25.90 +0.5= 26.5 {I take the .90 into the ten digital number}
The 0.5 is the seam allowance that we added to the piece.
Now you have the body measurement you can start work on your second main body piece. You may use a whole piece of fabric for the main body part or you may
use
{patchwork style}. It is your time to have fun for this part. After
all your piecing. You will need to bond the patchwork piece to the
batting piece. Again, you can use craft bond spray adhesive or fusible
fleece.
I used free motion quilting on this piece. You may use the simple quilting lines or any fun quilting pattern that you like.
Trim your body piece down to the measurement you get. Don't forget add 0.5" for seam allowance.
Take two end of the body pieces and sew them together { it is 1/4 seam allowance}.
After sewn the two edges together. Flat the piece and mark the the left side of the fold. Repeating the same making method for the body piece.
Here is the mark.
Take the last marking point and match the sewing seam allowances.
Here is the look.
Now flat your pieces and you will get the other two sides marking.
After repeating the marking on the main body piece. It is time to join the base and body piece together.
Again, on the body piece. You'll need to make cross marks on the 90 degrees and dots on the 180 degrees. Take your body cross mark and base cross mark then match them together.
This is the look and pin them gether.
You will want to do the 90 degrees and 180 degrees markings first the finish the 30 degrees marking.
Make sure you work around with the pieces.
dot to dot matching
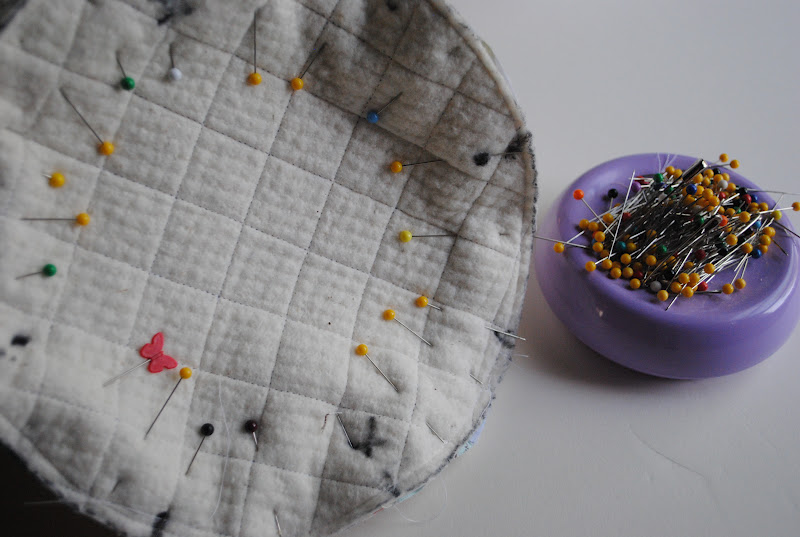
This is the look after you matching all the marks together. I recommend use many pins. It will make sure your shape and will turn out nicely after you finish it! I promise!
I like used zigzag on the edges of the piece. You can eliminate this step if you preferred.
Now turn your bucket inside out! Prepare two pieces of 8" cotton webbing.
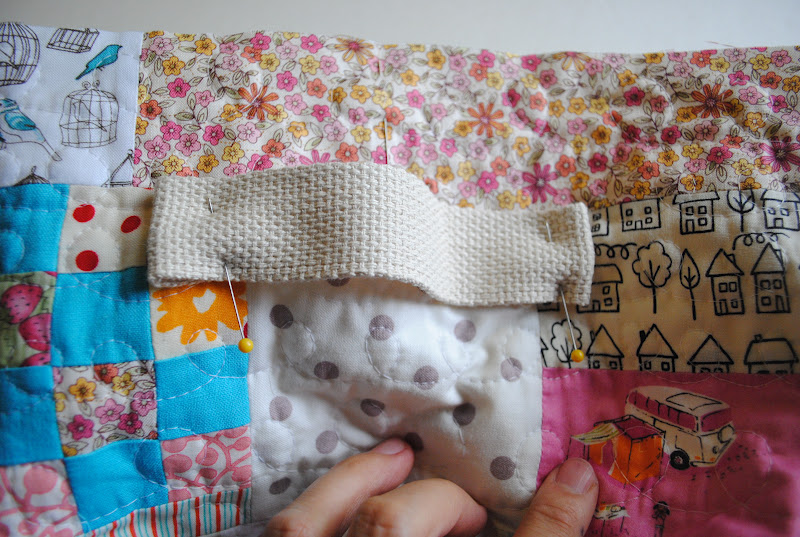
Fold 1" cotton webbing inside and on both side of the piece.
Piece it onto the patchwork bucket. I placed it 2" down from the top edge. Make sure you don't want your webbing too tide. Give it a little room for your hands to put in.
Work with your bucket size and find the center of the point, so you can balance your cotton webbing in the center.
Sew around the folded piece and I made a cross sewing on the piece. Now set your outer piece aside. Let's work on the lining park.
You will repeat the same sewing method, marking method, and same measurements for your lining piece. I used cotton and linen blended fabric for the lining which gives a nice look.
The base.

On the main body piece. You will need to leave a 2.5" opening for later turning. Remember to back stitches on the red points.
Attach two main parts together. Remember use the marking matching system. Making round shape is tricky! If you have all the degrees matched you'll get a perfect round shape at the end.
Again, I used zigzag to finish the edges.
Now you have the outter and lining pieces finished. Turn your outter piece outside in and your lining piece inside out.
Line two pieces bucket pieces right side together.
Pin two pieces right side together. Use lots pins!! It sounds like a lot of work, but you really do need lots pins to prevent any move/ shift during your sewing period of time.
After you sew around the circle.
Now go find your 2.5" opening... Slowly pulling your patchwork pieces out.
This is what it looks like after you pull your outter piece and lining piece out.
Now need to close the 2.5" opening. Give a nice iron press here. You can either use sewing machine to close up or use ladder stitches to close up the opening.
I used ladder stitches to close up the stitches. I prefer the clean look for the patchwork.
After closing.
Now you are almost there... set your lining piece inside the outter patchwork bucket and line the top edge together. Top stitch around the circle.
wa... la.. You have made a {patchwork bucket}. This is great for any kids toys, store your fabric scraps. We used some of these for our picnic trips.
I just love these simple {patchwork buckets}
It is crazy that I have taken over 100 photos for this project, but I certainly enjoy it! Hope I make sense for you!
Someone is asking me if this is for her.... { we all know who that is!!!}
I think we will share instead!
The fabric pieces I used were all from my scrap bins and some of orphan blocks.
I hope you enjoy this tutorial. If you ever make one, please join me and other friends in the
{ made with 1/4" mark} flickr pool. I'd appreciate you give me full credit for making this tutorial for you and not selling it in your stores. Of course, it is hard to prevent people who do that. I am off to make few more {patchwork buckets}. I mean it is almost time for Christmas! So make as many {patchwork buckets} as possible and stuff it with lots of Christmas goodies for your friends and family!! I really mean stuff it with all the goodies!! Thank you for reading and hope all make sense to you.
Enjoy
xxC