Tuesday, September 17, 2013

Tutorial: the triangle pouch


 {S' triangle zippered pouch} is really sweet and I didn't wait too long to make another one for myself. My sister is next in line then a few more for Christmas gifts. This year, I plan not to wait to long to start the lists of sewing. Have you started your handmade gifts? Maybe this tutorial will make it into your list this year~  This is another long post! over 70 photos and again, please let me know if you need more clarification on any step.  This is another great scrap project, so pull your scraps out and play hard~

1. cut 20 a sorted of 2.5"x2.5" fabric
Material:
Cut 20  -2.5"x2.5" 
Cut 1 - 3.5"X10.5" { exterior base piece}
Cut 1 - 11.5"x10.5" { pouch lining}
 Cut 2- 3.5"x3" { exterior sides fabric}
Cut 2 - 3.75"x3.75" { interior sides fabric}
Cut 4 strips of bias tape for binding 
10" zipper
Batting scrap
between needles for hand-quilting
quilting thread
sewing cotton thread 
needle for hand binding 

Set your seam allowance to 1/4" unless noted

 2. sew 5 pieces of 2.5"x2.5" in a row

 3. Need total of 4 rows

 4. Join 2 rows together and need two sets of patchwork pieces.

 5. Cut 1 piece of 3.5"x10.5" for the exterior base piece

 6. Join two sets of the patchwork piece to each side of the exterior base piece.

 7. The back of the patchwork looks like above image; please flip the seam allowance, that would avoid the bulkiness.

 8. Use warm iron then gentle press

 9. Open the seam in the back and gentle press each seam

 10. prepare for hand-quilting; basted onto cotton batting

 11. Either hand-quilting or machine quilting will work on this part. This would be your preference. For hand- quilting, please check { tutorial here}.

 12. Baste around the perimeter of the finished quilted patchwork piece.

 13. Trim off the excess batting; After trimming off the excess batting, remeasure your finished quilted patchwork piece. During the quilting process, it might get 1/8" or 1/4" smaller than planned

 14. Cut 1 piece of 11.5"x10.5" for patchwork interior lining

 15. Set your quilted patchwork piece right side together with the lining piece; pin the top of patchwork piece and the lining together on both ends.

 16.  Set your machine 1/4" then top stitch the both patchwork top ends

 17. Flip the sewn piece inside out;  both sides need to leave un-sew

 18. when flip the joined pieces inside out. The patchwork would look like above photo

 19. Use warm iron gentle press down both end seams;  then pin the patchwork and lining piece together.

 20. Set 1/8" seam allowance; top stitch both top ends { These are where the zipper will insert}. It will help later process to avoid any bulky seams, so don't skip this step.  After top stitch both ends, set this patch work piece aside.

 21.  Cut 2 pieces of 3.5"x3" { Exterior sides fabric}

 21. Mark a 1/4" point on the 3" width side of the fabric; apply both top edges}

 21. Set rule in from the bottom edge point across the the 1/4" mark; use rotary cutter trim off the piece; apply to another piece as well.

 22. For both edges trimming. This is what the piece would look like; apply to the other piece as well.

 23. Set both pieces onto a scrap batting; baste on the batting

 24. Prepare for hand-quilting; machine quilting also work. For hand-quilting tutorial, please check
{tutorial here}

 25. Baste around the perimeter of the both side pieces.

 25. Trim off excess batting

26. Cut 2 pieces of 3.75"x3.75" for interior sides lining

27. Set the lining piece and quilted side pieces Right side together.  Sew the top together then flip the lining to the back. Warm iron gentle press on the top seam then used 1/4" seam allowance top stitch the top edge. Baste the bottom edge with 1/8" seam allowance.

28. Bring quilted exterior patchwork out. Set the interior lining side on top. Take one side patchwork piece then set on the center base then pin. Set 1/8" seam allowance on the machine.  Sew 1/4" away from the start sewing then ended before 1/4".

29. Check on the top image where leave 1/4" space.

30. Two pieces attached. 

31. Bring the side patchwork piece to the other side of the exterior patchwork. Gentle pin two pieces together, then sew with 1/8" seam.

32. Then the next side of the side piece also pin onto the exterior then sew with 1/8"

33. The joined side pouch would look like above photo.

34. Apply Step 28-32 to the other side of the side exterior piece.

35. Now your pouch would look like a box from the above image.

36. Bias binding  is a narrow strip of fabric, cut on the bias which is being cut at 45 degree to the length of strip, makes it strtchier as well as more fluid and flexible compare to a strip that is cut on the grain. I highly recommend use bias binding for any purse making, pouches making or tote making.

## Need for 4 strips of bias binding; 2 of the tape least 14 inches long and the other two need at least 10 inches long.

For  narrow bias tape: cut 1.25" wide
For wider bias tape: cut 1.5" wide
You can decided what you prefer. This will not make any differences to the pouch, just the look of how the pouch would turn out. {Check on the 1.5" bias tape cut I make for S}


37. Take the bias tape then channel through the bias maker then gentle press with warm iron

38. What if I don't have a bias maker? No problem!! What you can do is set your iron in lower heat then fold the bias tape in half gentle press that would give you a nice center line. Take one side of the edge fold towards to the center line the press; apply the other side as well.

39. Look at the bias tape that just iron. There should have three lines that's being  pressed. Take the shorter bias tape pin around the side of the pouch. Sew on the pressed line that you iron that's closed to the pouch edge. Sew all the way up on both top edge.

40. After sewing the bias tape the side pouch would look like above image.

41. Hand sewn the bias tape, just how you would sew for a quilt.

42. Check the top of the edge; it needs fully sewn

43. Trim off the excess binding tape make sure it levels with the top of exterior patchwork. Apply to the other end as well.

44. Prepare a 10" long zipper; either metal or plastic works.

45.  pin the zipper on one side of the pouch top.

46.  The zipper head is prefer level with the end of the pouch binding. Or may adjust how you like


47. Hand baste the zipper to the pouch is better for any zipper install if you are new with sewing zippers. For this pouch, I hand basted the zipper to stabilized the zipper's position on the pouch. It only take a minute or two  to do so, so if you can I recommend it!  The baste stitch can be big and it will be easy to take off later after sewn the zipper.


48. Change the sewing foot to zipper foot. Set the seam allowance to 1/8".


49. 1/8" seam allowance allows the zipper attach to the pouch finely at the edge. Apply the same zipper sewing to the other side of the zipper.

50. Now the zipper is finished installing.

51. Look for red tread or threat that's different from the white thread. I used hand-quilting thread for this purpose, which gives a nice wax coat outside the tread. Single treading is great !

52. When finish install zipper, will find both edge of the zipper fabric wide open. Use the tread and gentle give a few stitch to bring two zipper fabric together. This would help later tabs installation.

 
53. Apply to the other side with closing zipper fabric. 

 
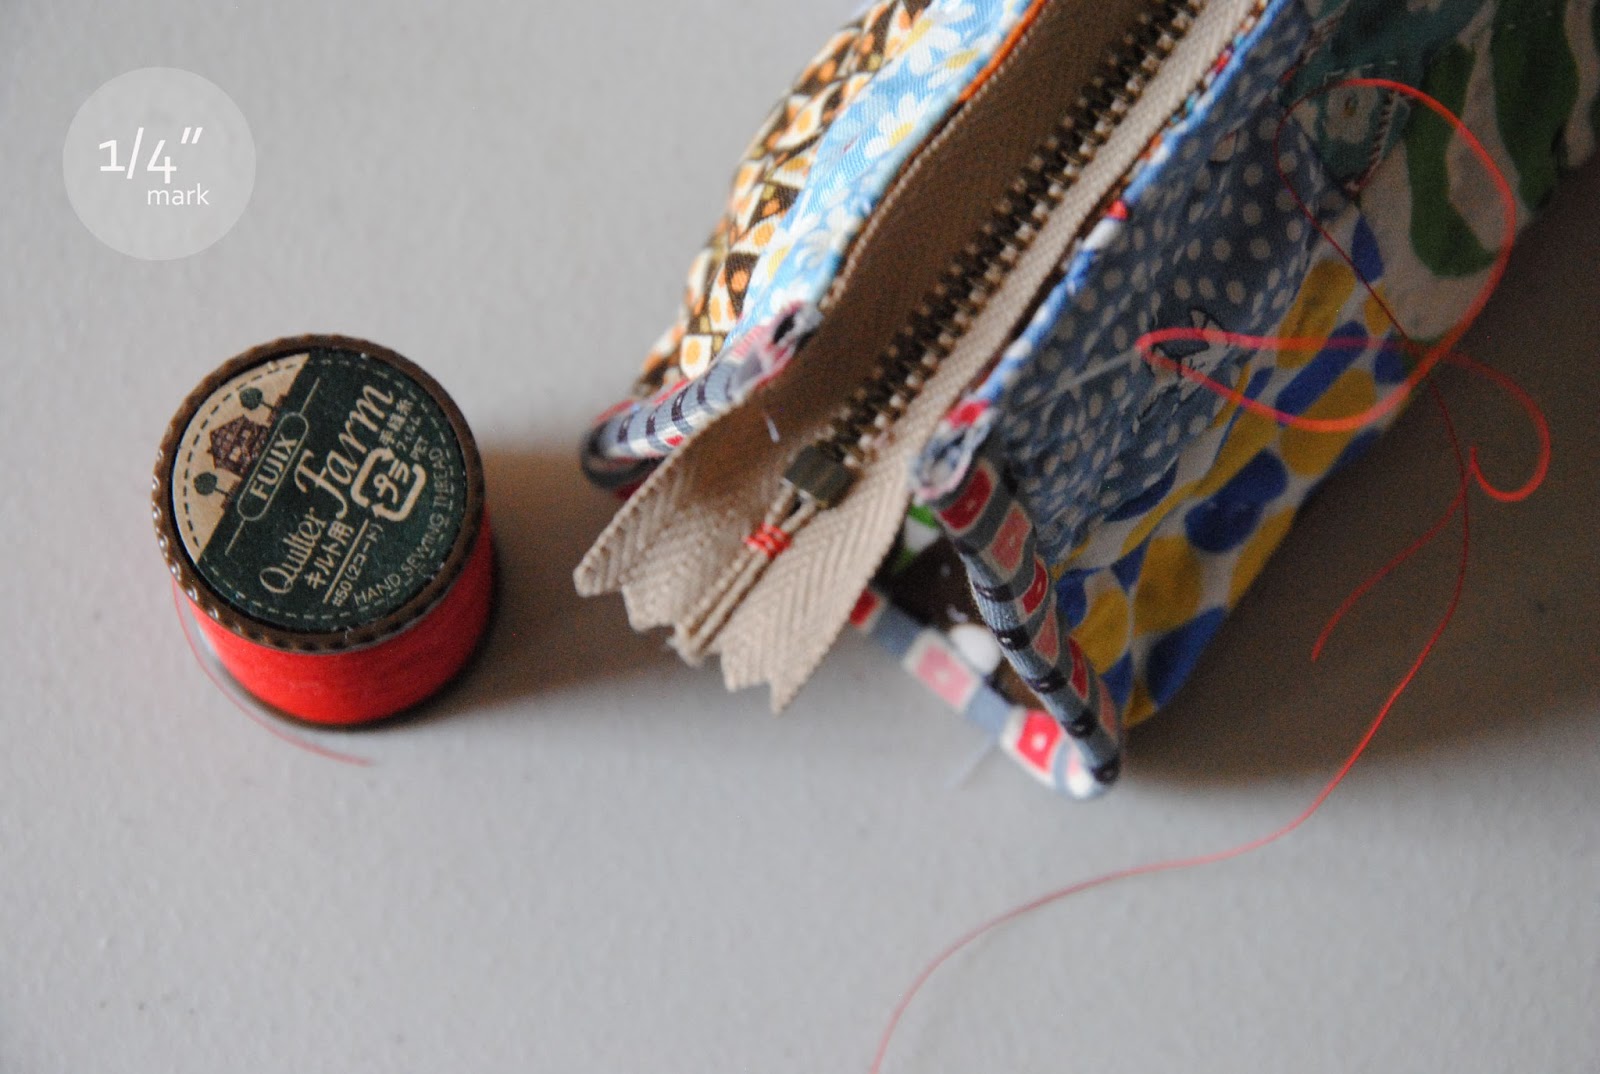
54. Take one long bias tape attach to the top zipper side. Apply sewing bias tape from Step 39. Sew the bias tape on the entire zipper. Apply to the other side of zipper.
 
55. Take close look on the top of the pouch. There are two sewing lines; one is the zipper install sewing line and one is bias tape ling. Make sure the bias tape covers the zipper sewing line. 

 56. Hand sewn the binding on both side of bias binding just how you would finish a quilt binding. Remember all the way to the end of the zipper.


57.Trim off the excess binding fabric


 58.  When trim off the excess bias tape, remember level the end of the zipper { You would want to cover the whole zipper with biding tape}.


59. close look; set the pouch aside


60. Cut two pieces of 1.5"x1.5"; These are for the zipper end tabs. {{ Note: For the side end tabs, please first measure finished zippered with binding and check width of the finishing size. If you prefer a longer zipper tab. You may cut the pieces larger in your preference; really no rules here}}.

61.  gentle press both sides with warm iron


66. Apply the iron piece on the top side of the zippered pouch. Line the edges together!

67. Turn the pouch upside down. This would give you clear look at how much actually zipper to sew. Slowly top stitch the tab and zipper together, pin.

68.  Use 1/4" seam allowance for both tab sewing

69. Set the pouch up. I purposely left the hand sewn red thread out to make it a bit zakka look

70. Finishing the tab sewing. Gentle fold the end of the raw edge of the tab 1/4" for a nice closer.

71. Held it with hand then start hand sewing from the top corner edge of the tabs. Use pin to held the fabric if it works better.

72. hand sewing around the tabs or machine sewing also apply. I leave some white thread on the sides for the handmade reason.

73... Awweee... what a long post ... when the zipper closed the side would force to bring it together then would turn into an triangle shape.

74. The zipper pull is super sweet and if you don't mind I have them in {#254 sewing shop}

75. I love all the zippered pouch I made and I can't tell you how many I have made and given away...  Loving this triangle zippered pouch that keeps all the sewing tools together. We took the storage boxes out from the table. More room to sew and work!

76. I am very pleased how this tutorial turns out and thank to S who needed a triangle pouch and allow me to work on each detail. Are you ready to make one? If you do, I'd love to see your version and please join me at { made with 1/4" mark flickr}. I have seen some really cute {mini ipad pouch} lately..


Hope you enjoy this tutorial as much as I write it.

xxc

30 comments:

  1. Thank you for sharing such a wonderfully detailed tutorial!

    ReplyDelete
  2. fantastic tutorial, thanks for sharing. Your pouch is so pretty, makes me want to drop everything and make one right away.

    ReplyDelete
  3. Love it!!!! I'll be ordering a zipper and charm soon and trying it out. I've really been wanting to make a special pouch just for me.

    ReplyDelete
  4. This is superb, Chase!! Very informative tutorial with amazing seventy-six (!) steps with clear color photos. Who can beat this?! Thanks so much for sharing with us!! I will definitely make this one!!!

    ReplyDelete
  5. Oh, Chase, as I can see - you are really very busy tutorial maker! :) Again great tutorial!!! Thank you for shering it with us!
    Have a wonderful time!
    Jola

    ReplyDelete
  6. what a lovely tutorial as always, Chase .. !! and look those hand stitching, so neat.. * I will love to make one for myself soon.. Thank you,dear..

    ReplyDelete
  7. Adorable in every. single. way! The fabric, the handstitched details, the design! Can't wait to make one! Thank you for the tutorial!

    ReplyDelete
  8. Thank you so much for sharing this amazing tutorial with us!

    ReplyDelete
  9. Incredible tutorial! If ten photos are good, then twenty are better---thanks for so much detail in the descriptions. Can't wait to try. Love hand quilting, too.

    ReplyDelete
  10. Chase you are just wonderful with the beautiful tutorials for adorable items!!!
    I'm still making the mini ipod pouch...my computer broke down so I couldn't get to your blog!!!
    When I'm finished I'll be excited to make this!
    Thanks for sharing your talent!

    ReplyDelete
  11. This is a wonderful tutorial! Thankx for sharing!

    ReplyDelete
  12. Thank you so much Chase - what a wonderful tutorial.

    ReplyDelete
  13. Thank you!! I will be making one to go in my sewing machine bag carry-all for sewing notions. I am using the Amy Butler Weekender pattern to make the machine bag for my new-to-me singer featherweight.

    ReplyDelete
  14. I love this! So many pictures too! That's always helpful.

    ReplyDelete
  15. Perfect tutorial.......and perfect pouch!!! Thank you very much!!!

    ReplyDelete
  16. I love this. All these pics help someone like me...I am a visual learner! Lol! Thanks for this tutorial!

    ReplyDelete
  17. hi!! It's so cute!! I will make one!! Thank you for tis tutorial!! Anne:-)

    ReplyDelete
  18. What a mega-fantastic tutorial! Over 70 photos - wow. I definitely want to make this lovely pouch, thanks very much.

    ReplyDelete
  19. Thanks so much for this lovely detailed tutorial. I can't wait to make one. My friend wanted me to make her a makeup bag and I love this design.

    ReplyDelete
  20. This is so cute! I love it, and thanks so much for the step-by-step instructions!!

    ReplyDelete
  21. It`s just beautiful-Thanks for the tips!

    ReplyDelete
  22. I just ordered a zipper and charms from you. Can't wait to make one!

    ReplyDelete
  23. Thank you so much for this great pattern!

    ReplyDelete
  24. Such a beautiful and clear tutorial.... many thanks for sharing!

    ReplyDelete
  25. Thanks for this wonderful tutorial. I especially like how you did the zipper so that tabs don't need to be sewn on the sides to hold the ends while zipping and unzipping the bag. I also love how the edges are bound with bias tape. What a nice contrasting detail.

    ReplyDelete
  26. What a great tutorial cant wait to get started !!

    ReplyDelete
  27. This is a super tutorial. I followed it a while back and just stumbled back to your blog. I must make it again!

    ReplyDelete
  28. One of the easiest pouch tutorials I have used and it turned out super cute. The pictures were very helpful. Thank you! Cute enough to give as a special gift. I modified the size of it without any problems.

    Found you via S.O.T.A.K Handmade. She recommended it. If she liked it, I KNEW it would be terrific.

    ReplyDelete

Note: Only a member of this blog may post a comment.