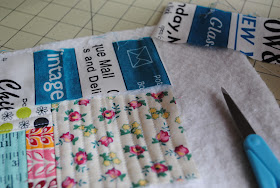
I picked some small pieces of the scraps and start looking. Hint: Go with your instinct! If the first piece catch your eye then that would be your first start off piece.
In the center?
The scarps batting is about 10"x7". I freely cut with my scissors with out measuring. Later on, you will trim the edges off, so don't worry at this stage. Where to lay the first piece?? Play around your first piece composition.
Off center? lower side of corner?
Upper side of the corner?
There's no rule where you place your first piece or what you should put your first piece. Sometimes, I might start around the center then my next piece would be off.
The first piece was around the lower corner. I began with simple straight stitches. I set my sewing feet to 1/4" seam. Between each quilting lin it is 1/4" apart. The method is called quilt as you go.
You will be seeing quilting lines in the back of your batting.
After finished the first piece. Look another piece that's either similar in length or in width. If it is too long trim it off with your scissors. With the color choose: what I have done here is using contrast color which is cool and warm. I don't use any ruler or rotary cutter until the very end of the assembling stage.
Lay the second fabric right side to the first piece then match edge to edge
Piece the second piece of the fabric to the first fabric piece
Flip the second piece of the fabric. I used a 1/8" seam for the top join seam. It will help to secure the seams together better.
Find your third piece do the same method from the second piece.
Now, you have a small patchwork piece.
After a small patchwork. I began look for a large piece of scrap.
As you can see from the ruler the quilting pieces aren't level! It is off, but don't worry about it! Keep playing!
My fifth piece cover the top of the patchwork, so it is longer and bigger!
The edges are off? You could use your fabric to adjust the off edge. Cover over the quilted part.
It is uneven and the composition is not squared!
Sometimes, I use large pieces to cover the edge of the batting.
Simply keep quilting then you can trim it off then save the other un-quilting piece { back to scrap bin}.
The fuchsia is became the key color for this small patch. I went look for some gray print. The one the Right took over the key color, so visually they are fighting. The left piece still have some gray print on it and it helps the other scrap pieces took out more! Color choose: light and dark
Again it is uneven patchwork, so I use the top piece to level the patchwork
So far the patchwork!
Added a little strips on the bottom to give a balance. Any batting that's no being quilted will be trim off later.
My sewing machine doesn't have the thread cut! So I ended up need to trim off the threads as I go! Sometimes it is such a waste!
Finished patchwork!
Take One: Fabric
Take Two: Scraps
EDIT: I would like to invited you to join my flickr and share your patchwork process. Thank you!
xxC


enjoying this very much--thankyou for posting these tutorial steps!!
ReplyDeleteThank you! I hope it is helpful for you! If you make one I'd love to see! :) xo
DeleteI am really enjoying this tutorial of how much work you put into your patchwork purse
ReplyDeleteThank you!! It is a great way to share with everyone! One idea, but always being able to expended to more new ideas/creation!
DeleteAgain, so, so helpful! Hey, have you made a Flickr group for people to share their Chase-style fearless patchwork? That would be fun!
ReplyDeleteKeep playing!! Hope this is explain well! Got the Flickr group up! Thank you for reminding me on that! You are great! xo
DeleteThank you soo much for this GREAT tutorial!!! Off to the scrapbox!!!!
ReplyDeleteI can't wait what you make!! I am excited seeing your work soon!! xo
DeleteThis is a beautiful tutorial! Your colour sense is wonderful. Thank you :)
ReplyDelete