Showing posts with label bags. Show all posts

Wednesday, January 11, 2017

Travel Outbound Bag Sewing Pattern + Sewing Kits


Are you ready to TRAVEL OUTBOUND?  I am excited to have my newest PDF sewing Pattern {Travel Outbound Bag} publish for the beginning of the new year. Travel Outbound Bag is a bag that you'd want to make more than one and make for gifts to families and friends.  It not only Travel Outbound, but also a great bag for all your needs that you take with you for traveling from living room to sewing room or from your kitchen table to your workroom table. Add one in your large tote with all your pens, notebooks, planners, great books to read, and digital devises as you travel your way outbound.   

Do you remember first time you travel? For me, first time I travelled alone was when I turned 18. I flew across Pacific Ocean and landed to a new country for my study. At the time, I carried a backpack and a 32" luggage.  Within my backpack there were so many important documents; passport, I-20 ( for international student forms), boarding passes, travel check, and books to read (over 25 hours transit and three flights). no digital devices at the time!    I can't tell you how nervous I was as an 18 year old. My hands always reach out to my backpack and making sure everything is there!  

When I became a mom, the first few years, I travelled not just a backpack and a luggage.  I also held a stroller and a little toddler by me and few carry on bags. It was more nervous than ever for the first time we flew together. The carry on bags had more than we needed, but all necessaries to make sure the little toddler made her way through the first big flight.  In my backpack, I carried two passports, two sets of boarding pass, books for the toddler to read, toys to passing by the waiting time, food for during transits.  I can't tell you how extra nervous I was. One of my hand is always reach out to the backpack and making sure everything is there and one of my hand is holding tie with the toddler who trying to see what's going on.

Last Fall, I travelled alone for the first time after 12 years being a mom. Without my soon to be a teen girl, it is strange.  You think that I should have became a better traveler after 20 years of traveling and I was! However, my hands still reach out to my backpack and making sure everything is there! It seems like an unconscious self is doing so! I laughed as I was waiting for boarding announcement.

As I was waiting for boarding the flight oversea, I started to think of why not design a bag that will fit all and I know all the belongs and documents are there. I started draft this pattern on a long 15 hours flight!  Gosh, I am loving this {Travel Outbound Bag}!

I would love to share a little more...
about Travel Outbound Bag- 

For traveling:
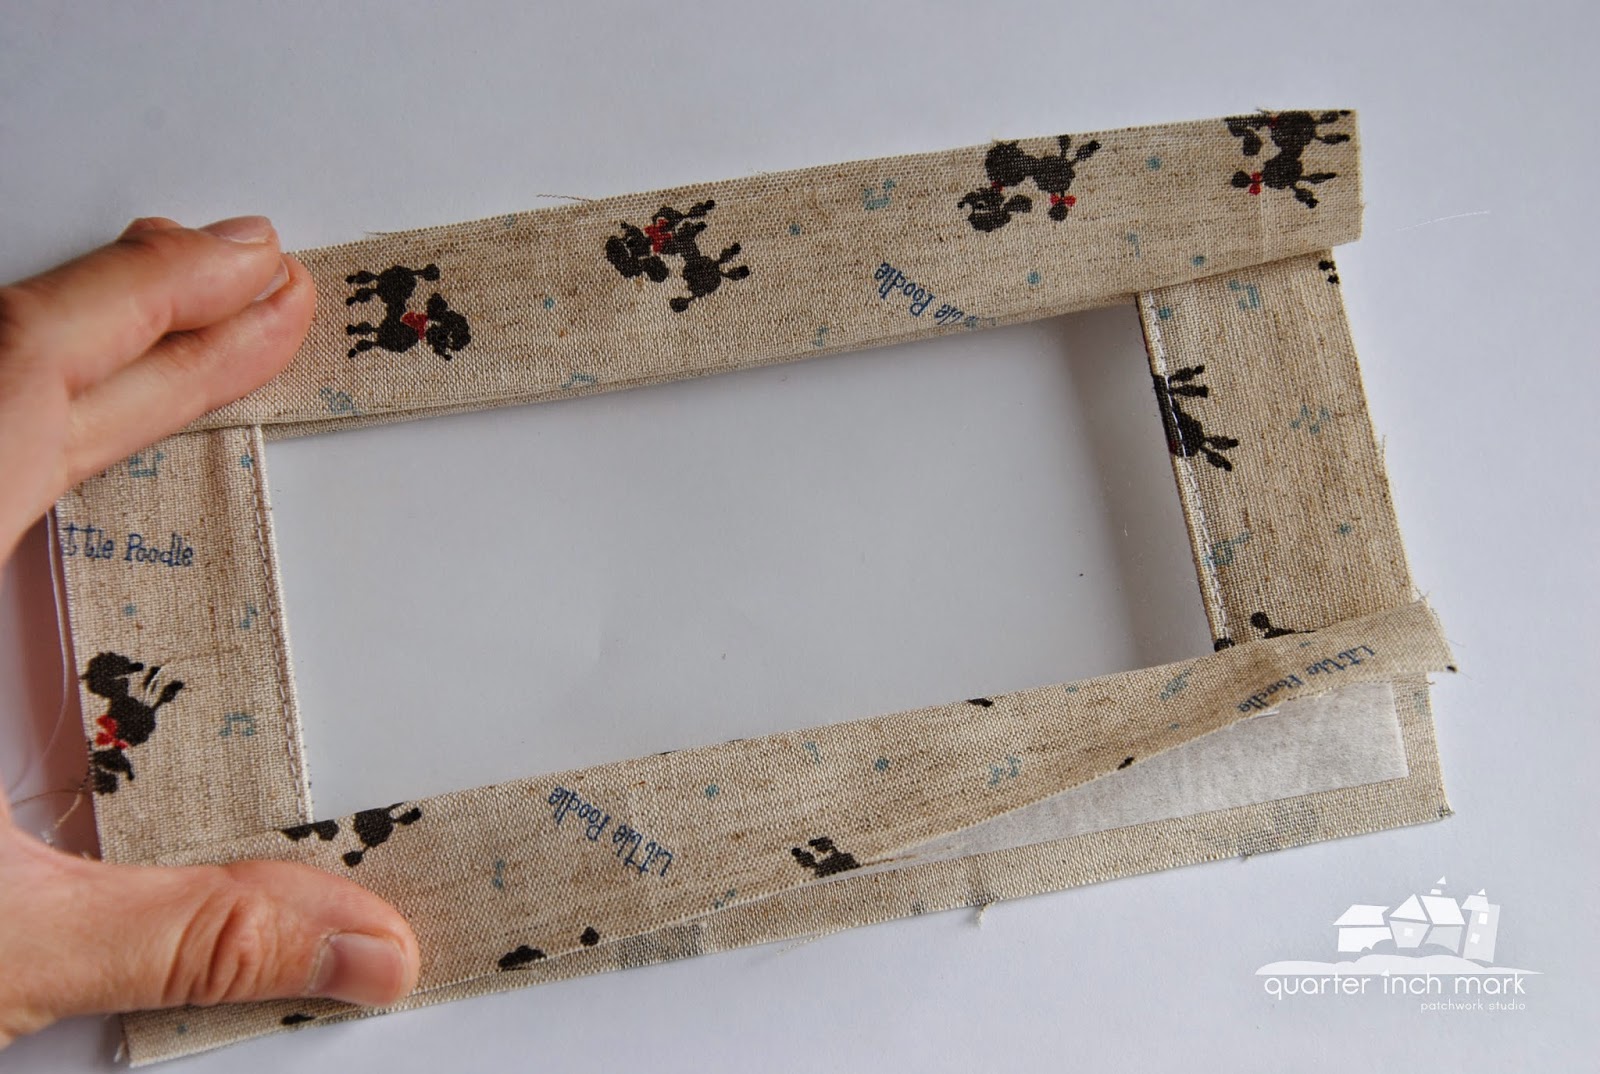
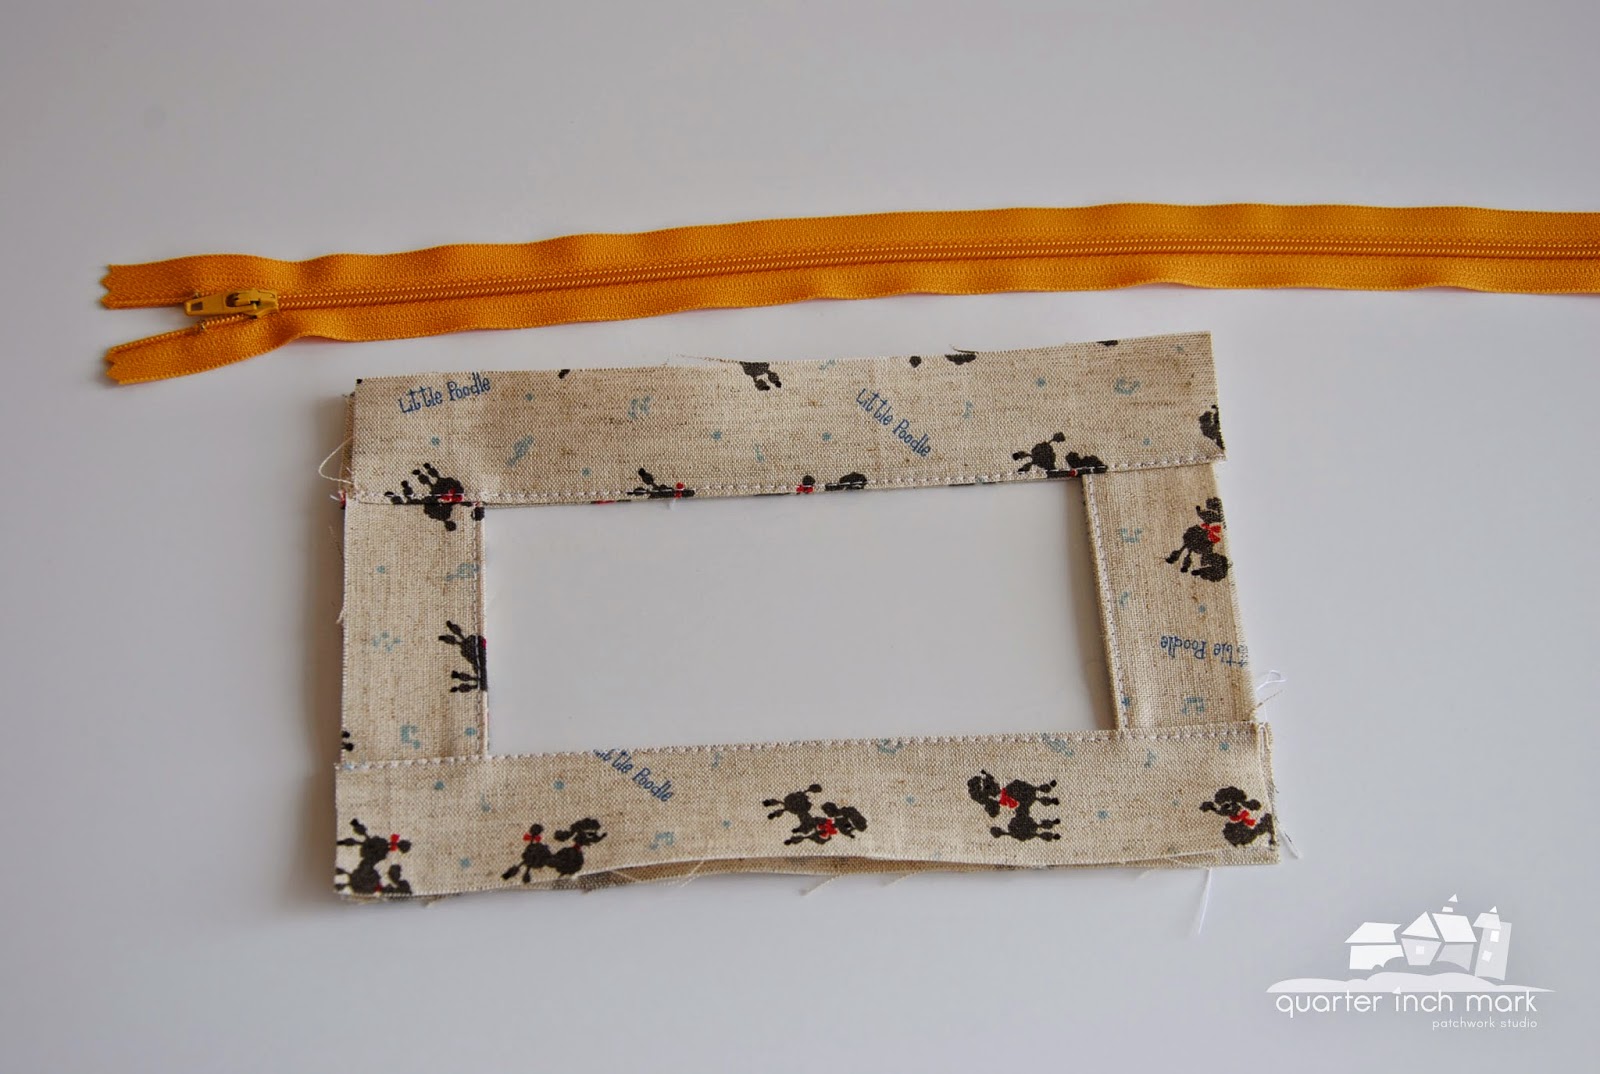
Travel Outbound Bag comes with four front compartments where can insert phone, passport, boarding pass, a few pens, even small cash/ coins.  In the middle large open section is a perfect place to hold planners, books, and iPad! Two of the zipper compartments allow to set more personal important belongs, such as travel cash, few actual cash, and documents if there are any.

I have been using it daily, since the first sample travel outbound bag created. I placed my new year's planner, journal, iPad and pens are all in the Travel Outbound bag as I finished for the day.  When I travel to the city, I set the Travel Outbound bag inside of large tote bag and slip Metro card in one of the front compartment as I go .  Everything is there! I really haven't been trying to reach out my hands in the large tote or backpack since then.

For Sewing: 
The Travel Outbound Bag is perfect for anything purpose. It is perfect for sewing table. The front pockets hold well with rotary cutters, pens, markers, small scissors, needle-book, and clips. The large open section fits more than 20 fat quarters and large sewing scissors. The zippered compartment is great for sewing patterns and different needle packs and more!


For everyday purpose: 
It doesn't just travel outdoor. It also travels within home and room-to-room that you go. I work on my daily planner on the kitchen table as I wait for the washer to be done; often time waiting and watching the baking goodies to be ready. I take the Travel Outbound Bag from workroom to the kitchen table, so I have everything that I need! It really is a nice little organizer bag at the same time!

I made a couple and set on the fabric shelves and have placed a few unfinished projects within them and each pattern set in the zippered compartment, small paper pieces in small paper bags. I take the travel outbound bag out for the specific project.

Travel Outbound Bag PDF pattern-
within {Travel Outbound Bag PDF pattern}

- This is a digital downloadable PDF file. It comes with 25 pages PDF file (included sewing pattern, cutting instructions, and measurements), Step-by Step colored photo instructions to guild you through making one Travel Outbound Bag. It also comes with detailed illustrate diagrams to aid for sewing steps.

- Travel Outbound Bag is an intermediate sewing pattern. Sewers have experiences in cutting fabrics, knowing operation sewing machine, have previous bag making experience will be helpful for making and experiences in bias tape sewing.

- Travel Outbound Bag measured at 10.5"x6"x3" in finished size.

- The pattern purchaser can sell finished Travel Outbound Bag made using this pattern (on a home based scale).

- You can find this pattern through my {Etsy} and {Craftsy} pattern shops now.

- You'll need Adobe Reader to open the PDF file and free download at adobereader.com


Sewing Kits:

There are limited Travel Outbound Sewing Bag Kits are available. It comes with high quality linens that I have been using for majority of my recent projects.  It will not restock after the kits sold out.  These colors are inspired by the cities that I have been surrounding since my recent move.


Let me share the linen you'll receive in the sewing kit. This is a medium weight of 100% linen is versatile with smooth look. It has a tighter weave, so it is perfect for any purpose sewing. It doesn't stretch as you sew. My little tip to you is enlarge your sewing machine stitch slightly longer and don't pull the linen as it will feed itself as the sewing feed dog will take on its own. The linen gives so elegant and classic finishes on any projects.  The solid colors give a bold and modern version of the style within. I hope you will enjoy it as well!


Brooklyn, it is my favorite dream place to be and stay. It has is great love of art culture and space for many artists to grow and meet each other. I used Oasis green and paired with Ginger Brown for the energy classic outlook and contrast with almost Evergreen for the bias tape as a highlight of the bag.

Kits available here (click)    Sold Out

New York, New York,  it gets so classic in every way! I love how This Autumn Gold matches with the Evergreen in this bag. The smooth and softened turquoise is a nice combine two colors together. It gives the elegant and classical outlook. The Autumn Gold is a rich yellow and gives such nice finish outlook.

Kits available here (click)  Sold Out 

Queens, the borough on Long Island across the East River from Manhattan. I can't tell you how pretty it is during the Fall around here as well as summer! The drive across East River is nerve racking, but the view is just gorgeous as you ever seen from the photos. I used chocolate brown and Asphalt gray as two main colors and used the rich autumn gold to give high contrast of this bag.

Kits available here (click)  Sold Out

Within the sewing kit:

You'll receive all the materials for making one Travel Outbound Bag.

-main panels
-main panel linings
-front pocket panels
-front pocket linings
-two mental teeth zippers
-fusible interfacing
-two set of rivet
-bias tape
-cotton trim
-a list of material sheet and interfacing cutting instruction
-downloadable PDF sewing pattern


Thank you again for all of your enthusiasm coming here to read about the creations I share with you. I really can't tell you how much I appreciate it! I truly have the pleasure developing this newest pattern and wish you'll love it as well!

Enjoy

xxc


SaveSave

Thursday, April 23, 2015

Handmade: Patchwork {Love} Zippered Pouches


This is a small limited edition of {Patchwork Love zippered pouches}. It is surely one of my favorite patchwork collection that I handmade for the {shop}. I strived for the fun patchwork concepts! For this limited edition, I tried and incorporated the diamond patchwork piecing with 100% linen! The outcome is perfectly matched well! Elegant and sweet! 

Patchwork piecing and hand-quilting is the signature of most of my works. I have hard time to put all the finishing patchwork pieces onto the machine then assemble up. The hand-quilting process provides extra care of attention to detail; an evident of handmade, which is imperfect in many way! But it really make each of my work as it is! Never can find a second work piece the same! I always pleased when each limited edition closed to the photograph stage; the handmade and the patchwork pieces that I have created is about ready to go out to the world {and nervous at the same time}.

This is a perfect size for traveling and everyday purpose zippered pouch! Lots of time, you'll see me carry mine with SD chips, USB, a few dollar bills, coins and special notes from a sweet person {whom you should have guessed}! 

There are total of five {patchwork love zippered pouches} in this limed edition and I will not produce the same style pouches in the future! I have another three diamond patchwork style pouches will soon to announce. They are onto the final assembling stage, since I have finished the quilting not long ago.

It will be a perfect Mother's Day gift to moms or yourself! Each handmade work from the shop is package with a handmade sewn archival glassine bag then a special handmade {thank you} tag is attached with {quarter inch mark} sticker. If you need to ship this gift to a special someone. I will enclosed a special note for you! All you need to do is leave me a note at "note to seller" box. I'd be happy to make this gift before Mother's Day, within US territory. For international buyers, I can't guarantee the gift will be on time for the Mother's Day, as the international shipping time takes 7-12 days, sometimes it could be longer due to the custom process. However, it is never early or late for gifts from someone!  {I think I am getting a special card this year}!

So, what I have been up to lately? I am getting so closed to finish up the {Daffodil Joy Quilt} then I think I have made my mind on the binding print! Also, I have been working more mini patchwork piecing for the shop and myself! I have more kin-cha-ku coming up, with a bit of fun twist. If you like to make one, pattern can be found {here}. I have been particularly into working with similar hues lately, which will soon to be introduced in next upcoming patchwork limited edition {tomorrow}. 

Thank you for all your support through the shop and here at the blog! You all have been special to me and keep me create and not giving up what I love to do! This  journey has been great with all of you accompanied me!

xxc


Saturday, December 6, 2014

Tutorial: Window Zippered Pouches


Back in the summer, after attended the school open house. The teacher sent a new note home with the supplies that missed out from the list. One of the supplies was a ring binder pencil case. S and I quickly made another trip back to the store and hope to find one. S stood in the school supply section for over an half hour and couldn't find the one that she is satisfied!  Then she tipped her head on the side and looked at me..UMMMM  Then asked me, mommy do you think you can make one from you fabric stash? Without a second though, I replied, OF COURSE! {i was actually hoping and waiting for her to ask me}. On top of my head, I knew that I need the clear vinyl to make the magic!We walked to the fabric section and bough 1/4 yard of clear vinyl.  After return home, I jump right in the studio and started {the project}. I had a few failed to start with, but S loves it! Last month, I worked and improved the pattern again and made/ adjustments on the pattern. I thought it would be great to make lots window pouches for the holiday season as gifts.These window pouches are ready to gift to S' teachers as holiday gift and nieces back home and will be stuffed with all kind of chocolates and fun things!  These are easy to sew up and you could make one in half hour or so!  Let's get start! 


Supplies: 
-Sewing machine
-Coordinate thread
-10" nylon zipper
-Medium weight fusible interfacing
-Clear vinyl  {I purchased 1/4 yard of clear vinyl. It will least for a long time if you only use small portion on the projects}
-Linen and Cotton blended fabric {If you use 100% quilting weight cotton, I would recommend to use heavy weight fusible interfacing instead}
-Iron
-Ironing board
-Rotary Cutter
-Ruler
-Be-Gone pen

Measurements for making one 5.5"x8" Window Zippered Pouch

Cut ------
Linen and Cotton blended Fabric { *indicated as A fabric in the following description}
4 pieces of 1.5"x3"
4 pieces of 1.5"x8"
2 pieces of 5.5"x8"

Medium weight interfacing {* indicated as B fabric in the following description}
4 pieces of 1"x2.5"
4 pieces of 1"x7.5"
2 pieces of 5"x7.5"

Clear Vinyl
1 piece of 3"x6"  { *indicated as C fabric in the following description}

Binding
Cotton fabric cut 1.75" x44"
Linen and Cotton blended fabric cut 2.25"x44"

Zipper
10" nylon zipper

Seam Allowance 
1/4", unless noted!


Prep. Time: Bring all the *A and *B fabrics out then fuse the *B fabrics onto *A fabrics. As you can see, the *A fabric left with 1/4" seam that's unfused.


 Completed all the ironing process for *A and *B fabrics

Use Rotary Cutter and cut one piece of 3"x6" *C fabric for the window. 

 Checking time!!  Do you have all your "fabrics" ready to go before the next step?

Step 1   -Bring two pieces of 1.5"x3" *A fabric out
             -Sandwich the *C between two pieces of *fabric

 Step 2  Lined edges of *A and *together

Step 3 Sew with 1/4" seam allowance

 Step 4  Now, bring the two *A pieces together

 Repeat step 1.2.3.4 for the other side of the *C

 Step 5  Bring two *pieces together then top-stith close to the join edge; repeat for the other end.

Step 6  Bring two pieces of 1.5"x8" *A pieces out; sandwich the *C in between

Step 7  Use sewing pins on the side to stable the 1.5"x3" *A fabrics.  Sew with 1/4" seam allowance; repeat for the other end.

Open both end of the *A pieces.

At this point, the window is framed!

Step 8  Top-stitch along the edge of the 1.5"x3" *A fabric. You will need to flat the edge a little before top-stitch. The edges are getting "thicker" at this point, so you may enlarge your stitch length to make the sewing easier! And you have your "Front" pouch finished!!

Bring the zipper out, we are ready to install zipper onto the "front" piece

 Step 9  Place zipper face down, as shown on the above photo

 Step 10  Line the zipper onto the edge of ONE piece of  1.5"x3" *A fabric

This is what it looks like

 Step 11 Sew the zipper onto the *A fabric

Step 12  This is a tricky step, but follow along...  After attached the zipper onto the *A fabric; "fold" the sewn side of zipper inside of the *A fabric

This is what is looks like!

Step 13  Gentle press with warm iron {no steam} on the zipper and *A fabric, DO NOT  Iron on any part of the *


 Step 14  Now we'll be working on the opposite side of *A fabric that's without zipper

 Step 15 Iron/ fold the 1/4" seam allowance inside of the *A fabric; shown on above photo

Step 16  Bring two ironed *A pieces together; the image shown above is the the opposite side of the from piece ( see the zipper is wrong side?)

Step 17   Sew on the zipper side edge of two ironed *A-1 and *A-2 pieces together. You will need to make sure you have catch/ sew the back *A-2 piece that has been ironed {Front piece window shown above}.

Step 18  Top-stitch along the edge to reinforce the edge { The shown image above is the back of the front window piece. Check you'll get a clean look of the edge; no Raw edge since you have ironed and folded in the raw edge inside}

 Step 19  Bring out two pieces of 5.5"x8" *A fabrics

Step 20 Place the one piece of 5.5"x8" of *fabric that you would like the window look through; Right side up

 Step 21 Place the second 5.5"x8" *A fabric RIGHT side out { It would be the printed side}
  
Step 22  - Sandwich the three pieces together { Front/window piece, 5.5"x8" A-1 piece that window look throughout, 5.5"x8" A-2 piece that in the back}
                - draw lines cross the zipper
                - Pin layers together

Step 23  Use 1/8" seam allowance sew perimeter of the pouch; it is the idea of baste the layers together, just like sandwich a quilt.

This is the form of the window zippered pouch; we are getting there!

 Step 23  Clip the excess zipper ends; don't use your fabric scissors


Step 24  Making Binding Tape; here are two methods that I'd like to share.

For the Cotton binding tape:

Cut 1.75"x44" fabric strip; fold the strip in half; press with hot iron then bring the two edge of binding tape to the center press with hot iron. Or you can use a bias tape making to do so.


For the Linen and Cotton blended binding tape: 

Cut 2.25"x 44" fabric strip; fold the strip in half; press with hot iron then fold the tape in half again and press with hot iron. When using the linen and cotton blended fabric as binding tape you will notice it is thicker and you'll need to adjust your sewing seam allowance to 2/16" instead of 1/4".

This is the cotton binding tape I made and you can check in and see the folding lines

Step 25 Attach the binding tape onto the zipper pouch. Line the binding tape along with the zippered pouch then sew on the far right side of folding line

Just like making a quilt binding, you make a 90 degree fold on the corners that you sew that would give a nice corner folds!

Step 26  Fold the two ends of the binding tape together then press with fingers to create folding lines

 Step 27 Use Be-Gone pen and drew the folded  line that you create on both side of the binding tape

 -Pin the two pieces together or hold together if you feel more comfortable without a pin

Step 28  After a few attempts that I found if gentle fold the pouch in half way and bring the binding tape out is easier to sew the two ends together or you will need to ripped off the binding tape to give more room to sew two ends together.

 Step 29 Now the binding tape is attached!

Step 30 I used clips to hold the binding tape that I folded in; if you don't have clips don't worry! You'll still fold the binding tape in and can use pins to pin the binding, but be very careful!

Step 31 Sew around the binding tape!  

Step 32  HAPPY HOLIDAY!!

I hope you enjoy this new tutorial as much as I make/write it! If you are thinking to make a larger size or make a ring binder pencil case. You will use the same method, but enlarge the window size.  I used 2.5" on the *A fabric cuts! You also will need to purchase the hardware to install the holes. You can find these hardware in most of the local craft stores.  I love how the window shows little bits this and that! I am also so happy to share this new tutorial with you during this holiday season! It is a way of my {Thank You} to your time to come here to support and encouragements!

Enjoy
xxc

P.S. This is tutorial is for PERSONAL use only and proper credit given is so much appreciated!
P.S.S I need to apologized for another day late! We have had friends here in the city! I spent a very pleasant day with my dear friend yesterday; shop in craft stores, chat about fabrics, and had very delicious lunch together! Then Julie is in town for the holiday shopping, we had Julie's special soup, tasty pound cake{s}, and lots catch up! Oh.. when we got home was late for us. More soon!